
Happy 2017! I hope everyone had a good holiday season, filled with family and friends who may know that you collect and/or customize dolls but don’t judge you (too much) for it.
Anyway, my first commission of the year was an exciting one because I was asked to repaint my first Fashion Royalty doll!
What is a Fashion Royalty doll?
For copyright reasons I can’t post factory photos of these beautiful dolls on this blog, but here’s a link to a google image search I did for them: GOOGLE SEARCH!
At a very basic level, Fashion Royalty dolls are a line of high-end fashion dolls created by the company Integrity Toys. Integrity Toys is known for creating diverse lines of stunning fashion dolls, from a collection of Dracula’s brides to a collection of Jem and the Holograms. The Integrity Toys link above takes you to their page with all their different doll brands, or collections.
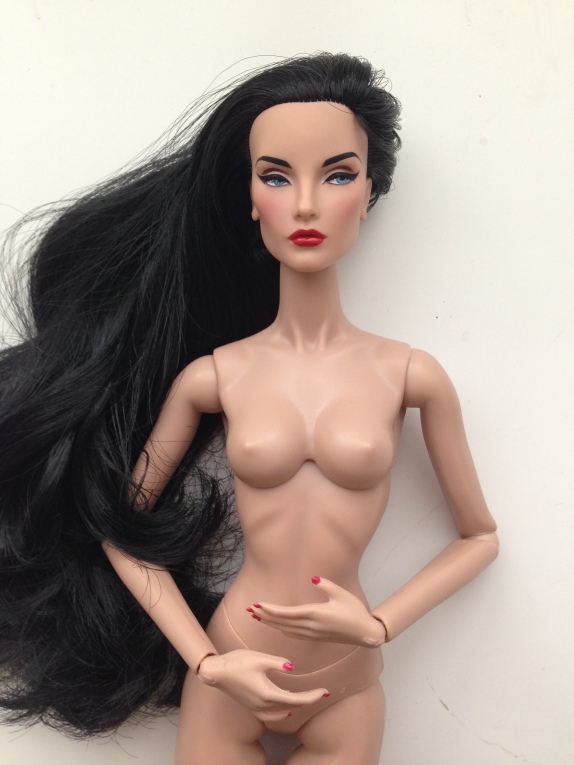
Fashion Royalty dolls are similar to other high-end fashion dolls, like Tonner dolls. They are incredibly articulated: all the normal points of articulation, but their chests and hips also swivel around. Barbie is perhaps a more affordable, distant cousin. Here’s a comparison picture of a Barbie I had lying around and the repainted Fashion Royalty doll.

Integrity Toys’ dolls retail for anywhere from $120 to $200+, depending on the collection and the outfit. They are only sold through authorized dealers, which are accessible through the Integrity Toy’s website.
How to Repaint a Fashion Royalty Doll
So to be really straightforward here, repainting these dolls is exactly the same as repainting any other Barbie or MH or Bratz or EAH, except they cost like $200 so it’s a little more nerve-wracking. If you were hoping for a detailed tutorial, this isn’t the right place because I’m really just covering the basic steps I used to repaint this beauty.
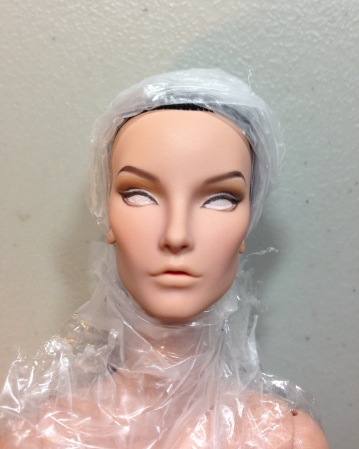
First Steps First: Take a good look at the factory paint job.

If you’ve repainted dolls in the past, you know that some dolls have very detailed head molds, so you can see exactly where the factory intended the nose, mouth, eyes, and eyelids to be. Examples of these dolls are some Monster High and Ever After High Dolls, some Barbies, and most high-end fashion dolls like Fashion Royalty dolls. Other dolls don’t really give a damn where the eyes or nose or mouth goes, it seems. I’m looking at my faceless Bratz and Moxie dolls, which stare at me from weirdly lumpy faces…and is that tiny bump in the middle supposed to be a nose?!
I recommend taking a look at the doll’s factory paint because that will tell you a lot about how much creativity you can have while repainting that doll. Fashion Royalty dolls have very, very, very sculpted face molds. They are pretty much meant to look a certain way, and only that way. There will be a pretty limited range of expressions you can pull out of them if you follow the mold.
Step Two: Prep for Repainting
1. Remove eyelashes


The photo on the left shows the tools I used to remove the lashes. Photo on the right shows the lashes removed.
You can do this with a small exacto knife or razor blade. Beginning on the outside or inside edge, carefully chip away at the lashes until they begin to peel or chip off (newer glue will peel, older glue will chip). You’re not using the knife to cut, but rather to chip or scrape. Use pliers to pull the lashes off when they are mostly detached.

The bad news: After you wipe the factory paint off with acetone (that’s the next step, just below), it’s likely that the glue and whatever paint is underneath the glue will remain on the doll. Acetone does not remove lash glue from dolls. Even worse, I don’t know what does. If you do, please leave a comment!
On other dolls with this problem I have been able to scrape and chip the glue away with an exacto knife. With this doll, I scraped away what I could, but wasn’t willing to start cutting for fear of damaging the doll’s face.
How to solve the problem: unfortunately, ‘solving’ this problem is really just working around the problem. Instead of chipping more paint (and possibly plastic) off, I opted to incorporate the remaining glue and paint into the repainted doll’s upper lash line. You can’t even notice it in the end!
2. Apply acetone to get the factory paint off!
Yes, it’s terrifying to apply a chemical that eats away solid plastic to a $200 doll’s face, but that’s what you do.


Some pointers:
- Acetone will not ruin the doll’s face, but it WILL RUIN the doll’s hard plastic body. If you are a shade more paranoid then I am, or don’t trust yourself not to fling acetone everywhere, you may want to wrap the doll’s neck and body up in saran wrap or foil or something to protect it from acetone drops.
- I don’t recommend wrapping the doll’s hair up before wiping the face. Acetone on the doll’s hair for a moment or two won’t damage the hair noticeably. Furthermore, when hair is wrapped, often times the wrapping will obscure the sides of the face or forehead too, and when wiping the paint off smudges and drips can collect unseen in those covered areas. You want to make sure the entire face is clear of all paint.
- To get all the paint: I start with Q-tips and then finish wiping the face with a cotton pad thing that I cut into quarters, as shown in the photo above.
Some problems:
- Staining: Despite the quality of a Fashion Royalty’s vinyl, or perhaps because of it, some staining is probably likely. My doll had light staining under her eyebrows, on her eyelids, and on her lips.
- Two options: Fix it or forget about it.
- Fix it: Staining can be fixed by applying 10% benzoyle peroxide cream (it’s basic acne cream available at drugstores) onto the doll’s stain and letting it sit in the sun for a day or so. Rinse and repeat if necessary. HOWEVER, I didn’t try it on my Fashion Royalty doll, so I can’t say if this treatment will damage the doll’s skin. It’s a possibility.
- Forget about it: I just covered the stains up with my repaint job and it’s totally not a big deal.
- Two options: Fix it or forget about it.
- Remaining eyelash glue: see above for a discussion of this.
3. Prepare for a first layer of spray sealant.
Wrap the doll’s hair and body securely in saran wrap, foil, cloth, or whatever the hell you want. It doesn’t matter. Just be sure to leave the entire face exposed to the spray – otherwise you will notice a line where there is sealant and where there is not.
4. Seal
Before you put any paint or pencil on the doll, first seal her face with two layers of whatever spray sealant you prefer (I use Mr. Super Clear Matt UV Cut). They should be sprayed about 10-15 minutes apart (some people wait eons before spraying, this isn’t necessary. Such a thin coat dries fast).
Repainting the Doll
 My Materials:
- Faber Castell and Derwent watercolor pencils
- Erasers (normal ones)
- A variety of brushes. Going left to right in the photo above:
- One big and fluffy for applying blush and for brushing eraser dust from the doll’s faces
- One really (30/0) with a fine tip to paint the lips and upper lash line
- One tiny (10/0) flat brush for applying tiny lines of makeup and the eyebrows.
- One with short, firm bristles to apply eye makeup and shading the nose
- Faber Castell chalk pastels
- Cheap-as-I-can-find acrylic paint
- Mr. Super Clear Matt UV Cut
I’ll just show my process here with some step-by-step pictures.
This photo shows the pencil and pastels I have put on top of the base layer(s) of sealant.
I’ve outlined the eyes, lashes, eyelids, and eyebrows with watercolor pencils. The shading is done with chalk pastel, dusted onto the eyelids with the short, stiff-bristled brush with the clear handle. Her eyebrows were filled in with black and brown pastel dust.
If you notice the yellow-ish look above her eyes, that’s the staining left over from the factory paint. I just blended it into the new faceup.
After this work, I SEALED the face once more.

After the sealant dried, I added irises and pupils, filled in the brows with pencil, added a small mole, built up her makeup, colored in her lips (with pencil) just to see if the color looked good, and blushed her face.
To blush faces, I start with the cheeks, but then I blush the forehead, the tip of the nose, and the chin as well.
After all that was done, I sealed her again.

After the sealant dried I did more work on the eyes. I shaded the irises, darkened the pupils, and added some white highlight to her lids and brow-bone, while making the lashes and makeup darker.
Then I sealed.
Here I’ve added teeny-tiny (JESUS THESE DOLLS ARE SMALL) lower lashes, and a few upper lashes. I built up color on the whites of her eyes, darkened her mole, and perhaps most noticeably, painted her lips in! I also painted in tiny dots of white in her eyes (used a toothpick for this, although you could use a tiny brush too).
Another thing I did was use black acrylic paint (diluted, of course. Always dilute) to paint over her upper lash line. Remember that glue that remained from her lashes? It has a sort of rough texture that prevents the black pencil from getting a really solid line in there.
Painting over the lashes with black was a very nerve-wracking moment.
One more layer of sealant (yes. So much sealant).

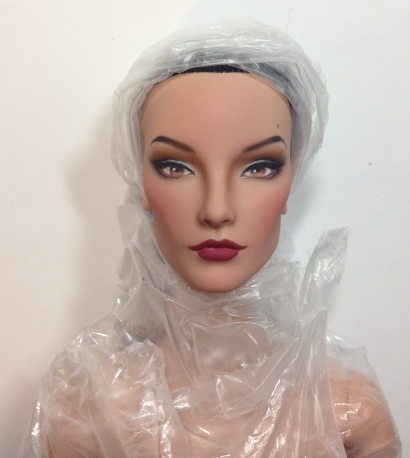
Here she is with a finished face! To add the finishing touches I applied several layers of a satin gloss to her lips. Her eyes have been left matte so the owner can take photos of her without shine getting in the way of the details.

Most of the shadows on her face are produced by her own mold and my harsh lighting, but there is a bit of contouring that I added. I add contoured shadows to the sides of the nose, the temples, and under the cheekbones in all my dolls.

There’s a photo of the doll after I blushed and shaded her body. For a tutorial on blushing/shading a doll to make it look more realistic, check THIS THIS link out!
So if you have one of these dolls and you’re dying to repaint it, go for it! Don’t be afraid of ruining a doll you spent like $200 on. No big deal.
Not. It’s a big deal.
Be very careful.

Great tutorial! I have a bjd to repaint so I will follow your insrtuctions for sure 😀
LikeLike
Glad you found it helpful! Just know that BJD’s are made from a different material than Fashion Royalty dolls so you may have to substitute some steps along the way!
LikeLiked by 1 person
Yes, I know. My doll is resin one, so It’s quite ok to expirement 🙂
LikeLike
Great!
LikeLiked by 1 person
Hi! I recently purchase a fashion royalty body replacement. The only problem is the skin tone on the head is not matching on the body, is there a paint that i can use to change the color of the body?
LikeLike
Changing the skin tone of a hard plastic body is very difficult because paints, sealants, and pastels do not adhere well to the hard plastic. I would recommend trying to change the shading of the head (if it’s currently lighter than the body) if you have the proper materials (a sealant and chalk pastels). But it can be a tricky process. If the head is darker than the body, you might be out of luck.
LikeLike