Hello hello! Took a bit longer to get this up than I wanted, but that’s because I actually made THREE of these same tutorials. Every time I made the dress I realized a better or faster way to make it, so I re-did the tutorial.
If you want to learn about repainting makeunder/rescued dolls, or making shoes, check out these two tutorials: REPAINT TUTORIAL and SHOE MAKING TUTORIAL
Disclaimer: this isn’t the perfect way to make a dress. I don’t finish my seams inside the garment as nicely as many people do (if you are one of those saintly people, hats off to you!) and even as I made this tutorial, I realized a better way to make the skirt (which I’ll mention in writing, but I’m not making the tutorial over again or else it’ll never get written up!).
What will you learn in this tutorial?
This tutorial covers how I make a simple dress for Bratz dolls. I’ve modified this pattern and approach for other types of dolls, too, like Monster High and Ever After High. It’s easy to do.
What WON’T you learn in this tutorial?
This isn’t a tutorial that will teach you basic sewing skills. There will be plenty of pictures of what each step looks like after I’ve sewn it, but I assume that you have at least a beginner’s knowledge of sewing to carry you through.
MATERIALS:
- A small amount of fabric (really, you can do this with a 1/4 of a fat 1/4 if you wanted)
- A sewing machine (or a needle and thread and a very good, long movie)
- Pins
- Fray check liquid
- A seam ripper for the inevitable screw-up (I don’t even put my seam ripper away anymore. It just stays out on my desk)
- A fastener of some sort. I use velcro, you can use whatever.
- Other random sewing notions you probably need…like scissors, marker, etc.
Um….I have a life, here, how long is this going to take?
Not long! I can crank one of these dresses out in 30 minutes.
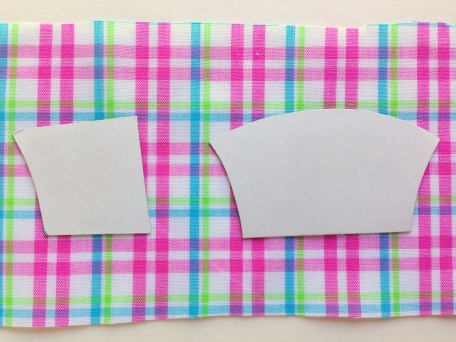
STEP ONE: GET A PATTERN
Waaaaiiiit…..you don’t have a pattern? No biggie. We can make one.
I did this part over a year ago now, so unfortunately I don’t have great photos of how I did it (okay, I have no photos). But it’s not hard.
I didn’t buy a pattern because I had a tank top made by Bratz that I knew fit the dolls. If you have a Bratz top lying around, pull out those seam rippers and separate all the seams. Lay the pieces out on some thin cardboard or cardstock, and add a seam allowance of about 1/4 inch (or whatever you want).
Or if that sounds like too much work, or you don’t have a Bratz top, buy a pattern from some wonderful patient person who sells them on Etsy.
You don’t really need a skirt pattern. It’s just a rectangle, and even the most craft-challenged can manage that!
CUT OUT FABRIC PIECES
Lay your top pattern over your fabric, making sure that any stripes/patterns are matching the way you want. Cut out the pieces! Make sure you have two layers of fabric cut for the top pieces, one for the right side, one for the lining. I sometimes use just a cheap white fabric for the lining, but I didn’t with this dress.
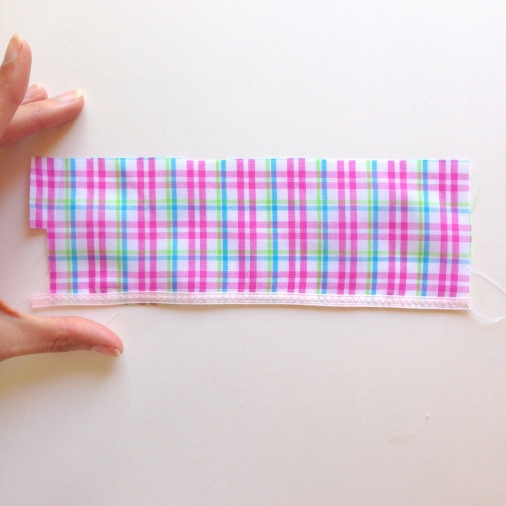
Cutting the skirt: The skirt I cut out here was about eight inches long. Notice the right side of the skirt has a little extra length cut out on top. This part will be to put the fastener on later (I use velcro, so I made the extra length the same width as my velco).
Keep in mind that this skirt will end up being rouched (or ruffled), so if you’re using a thinner fabric you can cut a longer strip because the skirt can be rouched more. If your fabric is thicker, like a normal cotton quilting fabric, you won’t be able to rouche the skirt as much because the rouched edge will be too thick for a tiny doll seam.
*Note to make this better* So remember I said I made this tutorial three times and found a better way to make this dress every time? Well, I could have made it a fourth time, but I’ll explain the difference now so I don’t have to do that. So instead of just cutting that extra little piece on the right side cut the little extra length thing on BOTH sides. One of the pieces will just be ironed flush with the skirt side so you can top stitch over it and keep the edge cleaner (this is explained better below). If you don’t cut out both sides of the skirt like that, the side without the extra length ends up being a visible raw edge, which is fine with some fray-check, but isn’t the most professional.

Cut? Check.
MAKING THE TOP

Pin together the top so the sides are lined up, right sides together of course. Stitch up the sides so you have the right side and the lining finished. If you’re using a pattern like mine, you’ll have three pieces of fabric stitched together, like in the photo below.

Trim the seam allowances to about 1/4″. Don’t go much thinner than that or you may rip the stitching out later! (Bad).

IRON! Get out the iron and press under a hem on the skirt. Be careful that you iron the shorter side of the skirt, not the side that has that little cut-out on it. If you want you can turn the hem over twice, I only do it once to cut down on bulk.
While you’re at it, press the seam allowances flat on the two pieces for the top, too. Helpful tip: press the allowances to the outside on the right side piece, and to the inside on the lining. This will help keep bulk down when you stitch them together.
ADDING STRAPS

If you don’t want your dress to have straps, you can skip all this. I make a lot of my dresses strapless because it saves a lot of time.
But if you like the idea of straps, take the lining for the top and wrap it around the doll to check strap placement. Make sure the side seams are lined up with the doll’s sides, then mark where you want the straps to be.

Cut out two strips of ribbon for the straps. I’ll be making halter straps for this tutorial, and the ribbons I cut were each about four inches long. I used the 1/4″ fabric for these straps because I’ll fasten them with velcro, and I’ve found velcro doesn’t really work on thinner ribbon.


In the photo on the left I’ve pinned the ribbon straps to the lining, over the markings. In the photo on the right I’ve pinned the right side of the top to the lining piece, right sides together, with the straps in between the two layers.
Caution: if your ribbons have a front and a back side (right and wrong side, whatever weird sewing terms you want), be sure you’ve pinned them the right way (I messed that up on the first tutorial draft).

Go ahead and sew the sides and the top of both pieces together. Don’t stitch the bottom side, so you can turn the whole thing right-side-out and press.
Clearly, my stripes-matching was an epic fail.
THE SKIRT!
Sew the hem on the skirt (the hem you pressed earlier. You did do that, right?). I hemmed and stitched a ribbon on at the same time.
Optional: if you want you can turn over the raw edge of the hem another time so you hide that raw edge completely. I don’t do this unless my fabric is thinner, because otherwise I find it too bulky. And really, this is like a three-inch-tall dress for a doll that probably had a really skanky face on before you got your hands on her, so she can’t really complain about a raw seam. Please, doll.


Time to rouche! Which means ruffle, if you don’t speak bourgeoisie sewing language. I’m probably not even spelling it right anyway (‘rouch,’ that is, I looked up ‘bourgeoisie’).
Sew two loooong running stitches along the top of the skirt. Set the stitch length to the longest possible. Then pull one thread from each line of stitching and pull everything together. I use my dress top to measure the dress as I’m rouching. You want the bottom of the bodice (BODICE! That’s the word I’ve been looking for) to be the same length as the top of the rouched skirt.
Bodice. Bodice bodice bodice. Got it.
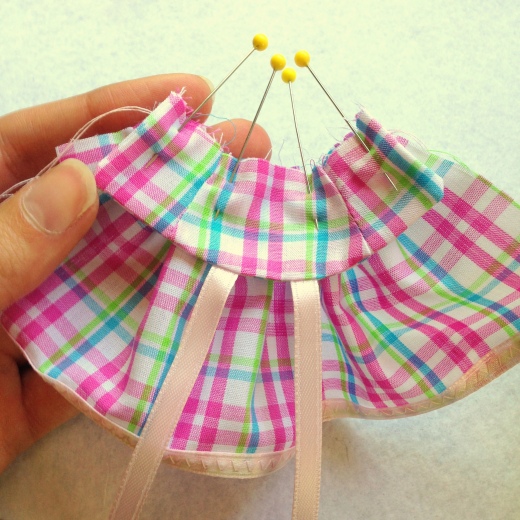
Pin the hell out of this bad boy adorable little dress. Remember to put the right side of the bodice and the right side of the skirt together. I sew two lines of stitching, one to reinforce.

Now we’re going to sew up the back of the skirt. Line up the sides of the skirt as shown, with the little extra cutout thing sticking out.
*Making this better tip* In the beginning of all this I said you should cut the little extra length thing (my vocabulary is utterly failing me today, but I’m charging on without it, apparently) on BOTH sides of the skirt. If you did that (you did, didn’t you? jk I don’t judge if you didn’t), press one of the little extra lengths back so the folded edge lines up with the rest of the side. Press, and just top stitch that little fold so it’s a clean line. This will be the side of the dress that overlaps OVER the little cutout thing that wasn’t folded over.

Okay stitch up the back of the skirt until you hit the bottom of the little extra cutout thing. Backstitch or otherwise reinforce the hell out of this seam, it will get tugged on when pulling the dress on and off those doll butts that are always weirdly big.
ADD A FASTENER! You’re almost done.

I used stick-on velcro, which works pretty well if you heat-set it with an iron after (it’s not iron on, which would be awesome, but the iron gets the velcro sticky stuff all up in the fabric weave so it doesn’t come off).
Just make sure that you put the velcro (or other fastener of your choosing) on the correct sides of the fabric. The side of the skirt with that extra flap thing goes UNDER the side where the flap was folded over (or the side lacking a flap entirely). So figure that out before attaching the fastener (that was the mistake in tutorial draft number 2).
FRAY CHECK
Does your fray check smell toxic? Mine does. It’s concerning.
Anyway, take a bottle of that stuff and put it alll over any of the raw edges. Let dry thoroughly.
FINISHING THE STRAPS


Okay sorry for the switcheroo here, but I didn’t take pictures of this on the plaid dress I’ve been working with. So here’s the first dress I made for this tutorial (it’s very funky. Bad.)
Take your ribbon pieces and wrap them around the doll’s neck to measure the length you want for the halter. Trim to the appropriate length and stick some more velcro on there.
AND YOU’RE DONE! You can go enjoy a glass of, well, whatever you want, and a good movie. Or keep going and make some shoe!
Part three of the makeunder series, shoe making, is HERE!
Oh wait…if you want to add accessories like bows or bows or roses or buttons or bows…go for it. I did. 🙂


Thank you for sharing these tutorials. The dolls are adorable after repainting. What type of pencils do you use for the repaint?
LikeLike