Just doing a quick giveaway announcement, because I want to reach as many of my loyal followers as possible!
I’m giving away two dolls:
The purple doll is a repainted and body-blushed Monster High Operetta doll. I’ve trimmed her hair a bit shorter. She comes without clothing (as shown).
The fair-toned doll is a repainted 2000-2001-something Bratz doll. She comes as shown, with a handmade dress and a pair of brown boots.
You can enter the giveaway through either I Am Loved Doll’s Facebook page and/or Instagram account (if you do both you get extra entries!). This particular giveaway is ONLY available to people living in the United States. I cover shipping, and I can’t afford to send the dolls overseas this time! I will either direct message or private message the winner, as well as announce them over my social media platforms on JANUARY 31st!
Repainting a face is well and good, but what about the rest of the doll?
That’s what blushing is for. When I say ‘blushing,’ I’m actually talking about shading. Shading a doll’s body will make the doll appear more realistic and three dimensional, just like blushing/shading the face does.
I’m sorry that I don’t have many pictures here. I had a terrible time trying to get good pictures that actually showed the blushing; unfortunately blushing tends to happen where shadows would naturally fall, so it was tricky to get pictures that showed the blushing and not just the shadow.
Materials:
A doll (note: this tutorial, and blushing in general, will work best on dolls with hard plastic bodies. Disney Princess dolls, Barbies, and Bratz tend to have legs that are sort of rubbery: this plastic doesn’t take well to blushing at all! If you’re working with one of these dolls, only blush the torsos).
Chalk pastels
Super optional: pearl PearlEx powder for highlights.
Paintbrushes in assorted sizes (at least one big-ish, one small, one tiny).
A toothy spray sealant (Mr. Super Clear is my go-to, but if you have a different sealant go for it. As long as it has some tooth or grain to it!).
*WARNING*
Before we get started, you should know that blushing a doll’s body makes the doll less awesome for playing with. Playing with a blushed doll can easily scratch the sealant and rub off the chalk pastel. This is especially common around the doll’s joints, where the plastic will rub against itself when the limb is moved around.
When I post dolls on Etsy with their body’s blushed, I encourage the dolls to be used for display only.
Okay now we can start: The Prep
Wrap the doll up to cover areas you don’t want to blush. This doll is a Disney doll, so her legs are rubbery and can’t be blushed.
If you’re planning on repainting the doll’s face, I recommend doing that first so you don’t accidentally rub off any of the body blushing while working on the face.
Wrap the doll’s head and hair in saran wrap so the spray sealant doesn’t get on it (wrap legs too if they’re the Mattel/Disney rubbery type). Then slightly spread the doll’s limbs apart, making sure to bend/place them so they are exposed to the sealant.
I spray the front and sides of the doll’s torso and arms first. Let dry. I then bend the arms so my next coat gets the inside of the arms (the outside and front of the arms is covered on the first spray). With the second spray I coat the doll’s back, inner arms, and the back of the arm. Let dry. Spray the front and outside of the doll’s legs (IF they’re the same hard plastic as the torso–if they’re that rubbery material, spraying them will work for a while but the sealant will normally start to fall off after a period of time. Most sealants aren’t designed to stick to that kind of material). Let dry. Manipulate the doll’s legs (if possible) so that the next spray gets the back of the legs and the inner legs. Spray. Let dry.
How much do you spray?
I dunno.
No, I kinda do. Only kind of, though. With MSC there is a very fine line between too much, where the chalk pastel won’t stick to it, and not enough, where the chalk pastel won’t stick to it. I spray from about ten to fifteen inches away from the doll, and do a fairly light coat. If you see the doll’s skin become shiny with wet sealant, that’s probably too much but it may not be the end of the world. Don’t panic. Panicking is not conducive to a relaxing evening of body blushing.
What brushes do you use to blush?
My brushes! And a pen (for sizing, although it is a nice pen).
I use three brushes to blush. (1) The first is a big fluffy eyeshadow brush i bought at Fred Meyer for $3.00 or something. (2) The second in a small cream eyeliner brush that I got for free with a horribly expensive cream eyeliner I bought forever ago. I love it for blushing because it has short but firm bristles, so I can really smudge the chalk dust around. (3) The third is a super small 10/0 shader brush by miniMAJESTIC ™.
The fourth is a pen. No, I’m kidding. Don’t use a pen.
Picking the Right Colors
Choosing what colors to shade with probably comes naturally to most of you who are artsy enough to customize dolls. But there are a few rules of thumb.
Do not shade with grey or black unless your doll has grey skin. There may be a few other exceptions to that rule, but otherwise you’ll just make your doll look like a sickly zombie, and that’s not great (unless you want a sickly zombie, of course).
Choose a tone, warm or cool, for your shading. This will help you determine the darkest color for the shading. For example, my model in this tutorial has bright pink skin, and the customer who commissioned her wanted cooler tones. So my darkest color for shading was purple (a cool color), whereas it would have been red if the customer wanted a warm tone.
Don’t shade with only one color group (i.e. green, including all shades of green). For example, my model in this tutorial was shaded with two shades of pink just deeper than her skin tone, as well as purple, which gives the shadows extra dimension.
I would encourage you to shade with a bit of pink, even if the doll’s skin color is blue or grey or whatever. It’s up to you. I just think that adding a bit of pink makes the doll look a bit more alive.
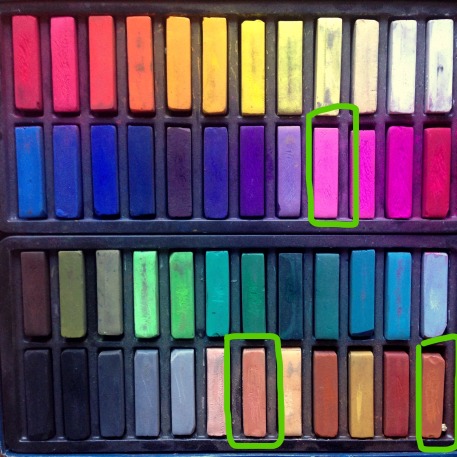
Here are the three colors I picked to shade my doll (remember, she is bright pink, so that’s why my shading colors aren’t normal skin tones):
The three colors I used to shade Goo. BTW, this is a Faber Castell palette of 48 soft pencils. Each pastel is about 1.5 inches long.
Ready, Set, Blush!
Once you’ve picked your colors, use an Exacto knife or coin or butter knife or nail or nail file or whatever to gently scrap the chalk pastels into a fine dust. Don’t scrape too much: you can scrap more later but once it’s scraped it gets really hard to store without smudging everywhere.
Some tips:
Start with your lightest shading color (it should be just a bit darker than the doll’s natural skin tone), and layer the darker colors over it as needed.
Keep in mind the doll’s anatomy when choose where to place shadows. If you stand the doll up in natural light, the areas where the shadows naturally fall, or would natural fall if the doll had actual bones and muscles, is where you should blush. The skin under the breasts, around the collar bones, around the belly button/abdominals, around joints, in between fingers…all those places should probably get blushed.
Blush the doll’s torso first, spray to seal, then blush the legs. If you do it all at once you’ll be smearing your earlier work around by the time you get to the later stages of the process. No good.
I start by blushing the big areas first, using my big-ish eyeshadow brush. On my model (meet commission Gooliope #2! We’ll call her Goo for short), I started by shading the area between and underneath her breasts, followed by her hip bones. I followed up with the darker shading colors under her breasts, but left the hipbones less shaded.
Then I take my small eyeliner brush (not the tiny one) and blush the smaller areas, including her belly button, collar bone, and in-between her fingers. Of course, Goo is a 17″ doll, so if you’re working with a smaller doll these areas may require the tiny brush (especially the fingers).
Goo is a sort of radioactive goo doll, so her skin is sort of…dripping. I have a lot of questions about if the radioactive goo hinders her fashion choices, but that’s for another day. My customer asked that I blush her so the drips are more enhanced, so I took out my smallest brush and used the darkest pink and purple colors to shade each and every drip.
Some more pictures, finally!
Highlighting
If we were working with almost any other medium, shading a drawing or painting doesn’t stop after adding the darker tones in. You would then add highlights to areas that will naturally pick up the light more. On a person, these are the tops of the shoulders, tops of the collar bones, tops of the breasts, etc. You get it.
Unfortunately, unless you have and are very good with an airbrush, options for highlighting a doll are limited. (If you’ve figured out a way to do this, PLEASE comment below!).
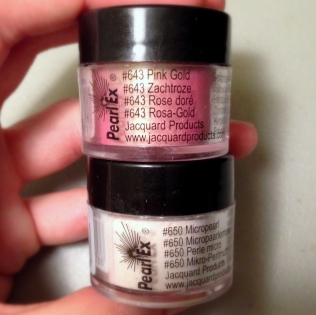
White chalk pastel, in my experience, doesn’t show up at all on the doll after applying it and then sealing it in place with MSC. Instead, I use Pearl EX powder to highlight.
PearlEx powder was made by the craft gods for those who love making everything shimmer.
PearlEX powder was featured in one of my Transition Stories posts, but if you didn’t read that, PearlEx is a very very fine shimmery dust that is normally used mixed with acrylic paint to give the paint a metallic sheen. When applied as a dry powder, it looks nicely shimmery. Even better, it comes in a lot of different colors (I have purple-gold, pink-gold, and pearl).
If you want a really shimmery doll, you have to apply the powder in several layers, because spraying it with a sealant dampens the shimmer a bit.
PearlEx powder was used on each drip and the pre-drip part of her leg. You can see one highlighted area that is randomly catching the light here. The other drip’s highlights don’t show up in the shadow.
On Goo, I put a touch of the pearl-colored powder on the tops of each drip. The effect is subtle enough that my camera can’t get a good picture of it, but when the light catches her drips they show up more!
PearlEx does NOT make a ‘glittery’ effect: the particles are too small for that. That said, it is shimmery, so if you don’t want your doll to have a slightly shimmery torso in some places, it may be better to skip the highlighting all together.
Here’s a few more pictures of the Disney Ariel I blushed alongside Goo. Her shading was super subtle (I think over-shaded dolls look scary), so I didn’t use her for my model. You can barely see the difference, but in person, she looks much better!
The three colors I used to blush Ariel.
You can see the shading on her nipple area, her elbow joints, under he breasts, and on her stomach.
You haven’t seen the last of Ariel…she’ll be featured in my upcoming blog about tattooing dolls (the faint marks you see on her chest, arms, and hands are the beginnings of a heavy ink job).
And…..an upcoming giveaway!
Here’s the first giveaway doll!
I promised that as soon as I reached 100 likes on Facebook I would do a giveaway! I reached 100 likes a couple weeks ago, just before leaving for a holiday trip. Now that I’m back at my work space, I’m working hard on getting two dolls (one made-under Bratz, one Monster High) ready for a giveaway. If you haven’t liked my Facebook page, do so now for updates on the giveaway as soon as it’s posted!
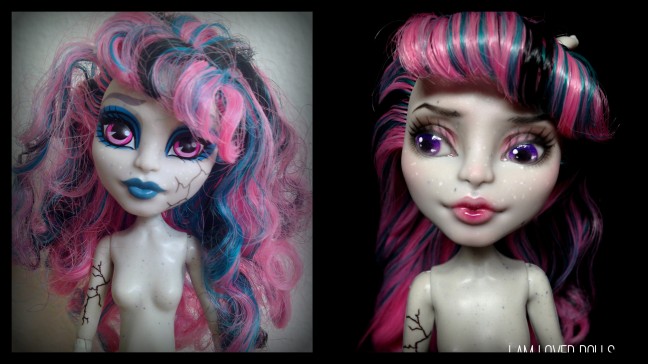
Update 2021: I had forgotten that I did a transformation story for this doll years ago. The full, un-edited post is still below, but I thought to update you on what Adelaide looks like now! See, I didn’t much like her first repaint after a year or so, so she got a bit lost in my box of dolls for a few years after that. I recently took her out of the box of lost dolls and decided to give her a makeover. Now, she looks like this! The original post starts after the photo below.
You know what’s less fun than customizing dolls?
School.
But regardless, I found some time to squeeze out another custom in between reading for classes, class, working, and sleeping. And Netflix (what?).
I used similar techniques for Rochelle as I did for my freshwater Lagoona a while back, so for more of a tutorial on how I repaint my Monster High dolls, check out THIS post.
Adelaide started as a Zombie Shake Rochelle Goyle, albeit a slightly unique one…
Most of the Zombie Shake Rochelles have even bangs, but the one I got had been rooted incorrectly, from what I can tell, and so her bangs slant down the side of her face. I kind of like the look – honestly didn’t even notice something was off until I saw another bunch of Zombie Shake Rochelle’s at Target.
Let’s get started…
Wiped, wrapped, and sealed. The first layer of color.
For this Rochelle, I decided on a more mature look than she wore with her factory paint. Her eyes are smaller and reshaped to allow for a heavy lid. Instead of painting on lipstick, I went for a slightly softer lip coloring.
The second layer of color.
I began defining her eyes and lips a bit more. I added the cateye lash to her upper lids, added her tear ducts, and intensified her eye shadow. Her lips were brushed with another layer of color, darkest in the center of her lower lip.
She was looking a bit pale, so she has blush now, too.
This was like…a week later…and probably three layers later.
Rochelle was giving me a lot of trouble with my MSC for some reason. But it also could have been the weather. I had a hell of a time getting intense colors, so I had to use quite a few layers of sealant to build up the color.
This shot was taken a week after I started her (no dolls on weekdays since school started). I probably sprayed two or three layers in between the last photo and this one, mostly just so I could layer on color.
Oh look, she’s done!
All done! One thing I really like about the Zombie Shake Rochelle are the cracks on her arm (you can see those in the picture above) and on her leg (you can’t see those, but I’m sure you have an imagination). I would have liked to keep some of the cracks on her face, but it didn’t quite fit with the look I had in mind for this repaint. Next time.
My two Rochelle repaints, side-by-side. I’ve improved a bit in the last two years…
Here you can see my two Rochelle repaints side-by-side. These are the same face mold. I think it’s incredible how a custom faceup can make the same face molds look completely different! The Rochelle on the right is one of my first repaints, and was an experiment in using primarily acrylics (no watercolor pencils). I’m thinking I’m going to re-repaint her now that I’ve gotten just a bit better at all this!
Both of these girls are in my Etsy shop! If you like the Rochelle on the right the way she is in the photo, adopt her quick! She’ll likely be taken down and repainted in the next month.
There is a time and place for incredibly detailed, here’s-how-to-do-everything tutorials, and this isn’t it. This is more of a quick step-by-step of how I repainted Freshwater Lagoona (Monster High). You can get the basic idea by looking at the pictures, but if you want to read some words there’s also a fair amount of how-to’s and repainting theory.
Note: for a detailed walk-through of the materials I use and how I prepare the doll for repainting, please go to this post: Repainting First Steps.
She’s very cute already. In a very aquatic way.
<< That’s what I started with. She’s a Freshwater Lagoona doll that I got in new condition from a friend’s daughter, who for some reason buys dolls, keeps their clothes, and then gets rid of the dolls themselves. I don’t understand that, but it works out for me.
Also, why does she have purple eyebrows!? She has no purple hair!
FIRST STEP(s)
Because I don’t have a respirator, and therefor risk immediate-onset lung cancer every time I seal my dolls, I try to seal as little as possible. This is not recommended for a whole bunch of reasons (see: lung cancer), but if you’re wondering why I do pencils and blush before sealing…that’s why.
Slanted, partly closed eyes make you think “oh, that girl is a b**ch.”
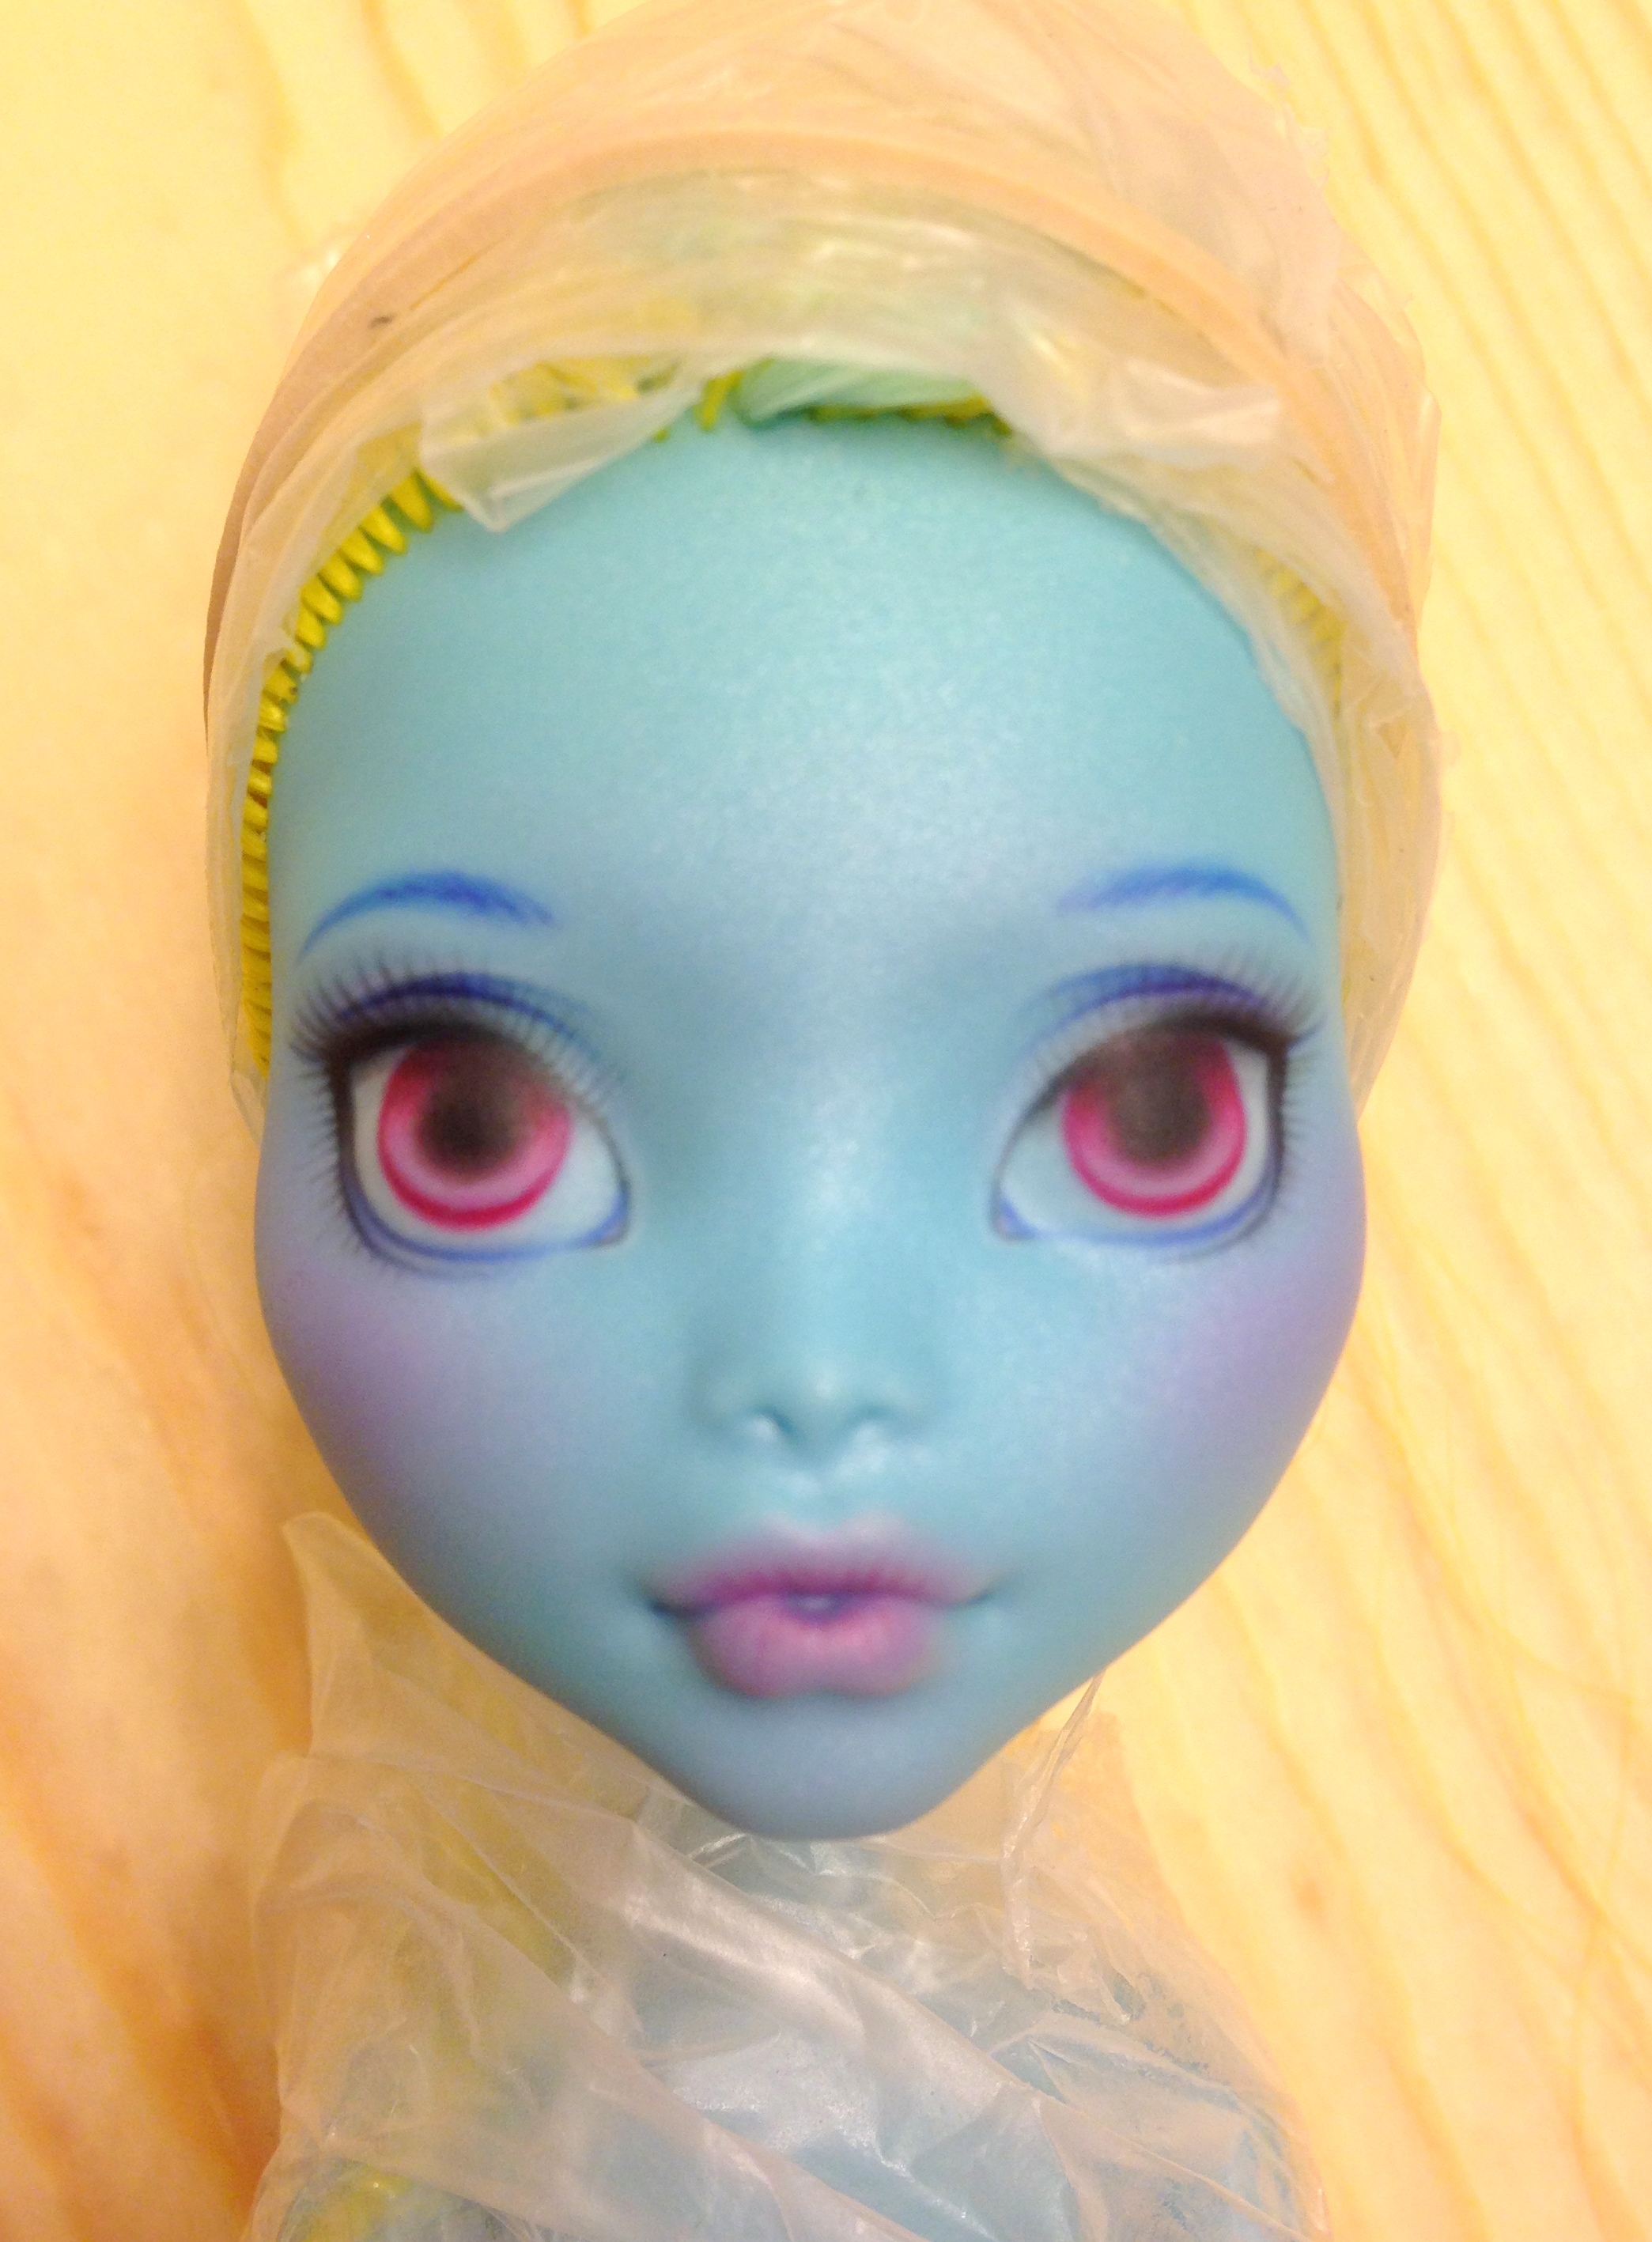
Eyes. So the first thing I always do when I begin repainting is outline the eyes. The shape and size of the eyes affects the rest of the face and the personality of the doll. I wanted Lagoona (hereinafter called Kit because Kit is a cuter name) to have a very youthful, innocent look, so I gave her very round, large eyes.
Tips for getting symmetrical eyes. Mostly just pray. But if that isn’t working out, start with the left eye (if you’re left-handed, start with the right eye). I’m right handed, and I occasionally turn the doll upside-down to draw the left eye. It helps my hand avoid getting caught on the doll’s nose. After you’ve finished the left eye you can copy it while drawing the right eye. If you start with the right eye, you can’t copy it very well while drawing the left eye because your hand will be in the way.
Colors. I’m not going to give you a course in color theory, mostly because I never took a color theory course and my 9AM college-level art class (where I should have learned color theory) was the equivalent of nap time. But I used a dark blue watercolor pencil to outline Kit’s eyes. Then I went over the upper lid with a black pencil, and added that extra little line under her lower lid with black pencil.
Eyelids. Eyelids are limited by the shape of the eye. If the eye is open wide like Kit’s, the eyelid has to be pretty thin in order to look normal. But if I had chosen a more sultry look (check out the sultry, you-are-so-beneath-me doll above on the right), the eyelids would have been larger. I do most of my eyelids with two lines like Kit has, but you can do them with one or three as well. Or five or six. You do you.
Eyebrows. Eyebrows do most of the expressive work on a doll’s face. By changing the eyebrows the tiniest bit, you change the whole expression. No pressure.
Asymmetrical brows have a very punk, what-do-YOU-want vibe.
I start out by drawing a very faint line where I want both eyebrows to go (turn the doll upside down, start with the left side, pray, whatever helps you get them symmetrical). Kit got symmetrical eyebrows, but some of my favorite dolls have asymmetrical brows (<<<). After the outlines are in place, I erase them so they are very, very faint and won’t be seen underneath the pastel dust. Then I take a small 10/0 flat brush and brush pastel dust over the outline.
Blush. I know a lot of people who blush first, seal, then go onto to eyes. Sometimes I do that too. But lung cancer is a serious health concern, so I consolidated those two layers into one and did the blush after the eyes so I wouldn’t smudge it while drawing the eyes.
Blush is the easiest part. You apply it just like you think you would. Get a little chalk pastel dust by scraping the chalk pastel with a razor, dip your brush in the dust, and smudge it on the doll. Good places to blush are the cheeks (what?!), the chin and the nose (very lightly or she’ll look like she has a horrible cold), and the forehead. Sometimes I do the inside of the eyes.
Kit’s cheeks were blushed with hot pink pastel and her forehead and chin were done with a lavender mixed with a lighter pink.
SEAL!!!
SECOND STEP(s)
Layer two. Added eye shadow, pastels to the lips, and whites of eyes.
So we’re really on step six or something, but we’ll call it step two for the sake of simplicity.
Lips. I always blush the lips on a separate layer from the rest of the blushing. That’s because as I scrub my little eyeliner brush (free with an absurdly expensive cream eyeliner by Clinique) with pastel dust on her lips, residual dust will fly all over her face and I need to be able to wipe it off without taking the rest of her blush with it.
Eyeshadow. I recommend shading the eyelid in some way. I used a dark blue watercolor pencils to shade in between the two eyelid lines, then added a lavender eyeshadow to the outside of her upper lids.
I also layered darker black on her outer lids/lash line because I didn’t think the black on the first layer was dark enough.
Eyebrows part II. You really can’t see this in the picture, but I took a dark blue pencil and made the outer tips of Kit’s eyebrows darker and more defined. I also added five or so little eyebrow hair lines in the inner tips of her brows.
Whites of the eyes. It’s hard to tell, but I added a layer of white watercolor pencil to her eyes in that picture. It didn’t show up particularly well, because it never shows up particularly well for me, especially on MH dolls. I prepared myself for lots more layers, and lung cancer around age 55.
SEAL!!!
THIRD STEP(s)
Added eyelashes, irises.
Funny story about how I totally didn’t notice that the irises were pretty much 100% different at this point (see the spaces underneath the irises?)….
Irises. I like my irises to be partly obscured by the upper lid (otherwise the doll will look crazy or terrified or shocked, and if that’s your thing, cool, but if not…) and sitting just above the bottom of the lid. I started out by outlining Kit’s irises in pink, then went over it in red. I don’t really have any tips for getting both irises symmetrical (clearly this is not my strong suit). Divine intervention is helpful.
Then I filled in the whole iris with pale pink, even the part that would be covered by the pupil. This is because I prefer a ‘soft pupil’ look on dolls, where the pupil sort of fades into the iris. I added a touch of red shading to the tops of her irises, just beneath her upper eyelid, and used a light grey pencil to start filling in the pupils.
Eyelashes. I loath eyelashes. The most important thing is keeping your pencil sharp the entire time. Kit got faint, perfectly-straight lower eyelashes, and very thin, slightly curved upper eyelashes. This is my favorite style for a youthful innocent look. The thicker the lashes get, the more made-up and mature the doll will appear.
Eye shading. I added some shading to her lower eyelids with dark blue and black pencils. I added another layer of white to the whites of her eyes. Still didn’t show up very well. I also added a thin white line just above her top eyelid line, beneath her eyebrow. I add this white line with all my dolls, and I think it makes a big difference in making the eyes pop.
Tear ducts. Just two tiny blue lines on her inner eye, filled in with pink. Easy.
SEAL!!! I always seal after I’ve gotten my eyelashes done. You do not want to suffer through that and then accidentally mess them up later.
FOURTH STEP(s)
Filling in the pupils. To achieve the soft pupil look, I alternate between coloring the pupils with pale pink, light grey, brown, red, and black, in that order. You could probably take two of those colors out and it would look the same. After I put the layer of black on, I’ll go back and blend everything with the pale pink or grey.
I also went around the outside of the pupils with red to make them pop a bit more. At this stage I still hadn’t realized the colossal mis-match in the size of the irises.
Eye shading. Don’t forget to keep developing the shadows created by the upper lid. I shaded the tops of the irises a deeper color to almost match the pupils. She also got a bit of grey in the whites of her eyes beneath the upper lids.
Whites of the eyes. Another layer of white.
Lips. It’s hard to tell from the picture, but I added some faint red and white lines on her lips to make them a bit more pronounced. This helps add depth and detail, too.
SEAL!!! Only because I still wanted to build up color.
FIFTH STEP(s)
You’re like, “Lady, steps four and five look the same.”
Building color. The only real difference between layers four and five is the depth of color in the pupils. I wanted them darker, with a touch more shading. I also added another (ANOTHER) layer of white to the whites of the eyes.
AND…I finally realized the mistake with the irises and managed to fix it by added a thicker red/dark pink line to the bottom of the irises.
SEAL!!!
FINAL STEP(s)
After I seal for the final time, I always add yet ANOTHER layer of white to the eyes. The varnish will cover it and seal it securely anyway. However, don’t do another layer with dark pencils on the eyes. The varnish just smears that around and will ruin your hard work!
At this point I take the doll out of her serial-killer-victim-saran-wrap costume because it’s normally falling off by now anyway, and because I’m done with the spray sealant.
White dots. I took a tiny white brush, mixed in some fluid retarder (see my Repainting First Steps post for more on that, but basically it just thins the paint), and put a couple tiny white dots in her eyes. Make sure you place the dots in the same place for each eye. Let dry. Really, let dry.
Varnish. My varnish is thinner, so it’s not as shiny. I put two or three layers of varnish on the eyes, and at least three on her lips. Let each coat of varnish dry before putting additional coats on.
I dislike this part of the process. It’s kind-of tedious, the perfectionist in me isn’t ever happy with it, and sometimes things happen and the doll is ruined before you even touched a drop of paint to her.
That said, preparing well makes the rest of the process much easier, so it’s not something to be brushed off. Read on for tips and advice about materials and doll prep.
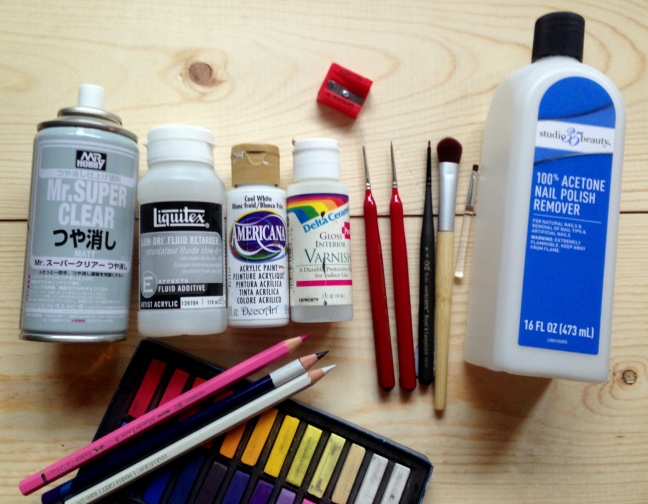
MATERIALS
Acetone. I use pure acetone from the nail section of a drugstore to remove the doll’s factory paint. Some people prefer to use other, less toxic and less horrible chemicals to do this, some people have found a non-acetone nail-polish remover…I like pure acetone. It works.
Sealant. I use Mr. Super Clear Matte, a fairly standard spray sealant in the repaint world. MSC is great because it has a nice tooth (or grain) to it that allows the pigment to stick to it and it’s not shiny. MSC is less great in that it is super toxic, and because I don’t have a respirator anymore, I’m probably going to develop lung cancer in a few years. Trade-offs, ya know?
MSC tends to be a little pricey. It comes in relatively small bottles, and costs about $10-20 dollars, if you get it from the right place. I always get mine on Ebay. It’s stupidly expensive if you buy it on Amazon. Junky Spot (there’s a link somewhere below) also has it, but I’ve always found the best prices on Ebay.
Watercolor pencils. I mostly use Faber-Castell and Derwent pencils. These have a high pigment concentration and they show up better on the dolls’ faces. One trick is to keep them very sharp during the whole repaint process, so a good sharpener is key. Using a good-quality brand of pencils is really important–don’t cheap out on these; cheap pencils won’t work.
Chalk pastels. I have Faber-Castell pastels, but I’m not sure that the brand matters as much for chalk pastels as it does for the watercolor pencils. The key with this is to really make sure you’re getting chalk pastels, not oil pastels or pencil pastels or anything else. My pastels come in a short rectangle cube shape. I scratch the side of the pastel with a razor blade to make chalk pastel dust.
Brushes. These are used mostly to apply chalk pastel dust, white paint, and varnish. I would recommend having a varnish brush that isn’t super high-quality, because I always ruin my varnish brushes for some reason.
I use three different brushes to apply pastel dust. First is a fluffy eyeshadow brush I got at a drugstore for no dollars (okay, maybe three dollars). This is great for applying blush to the cheeks and forehead–large areas. Large, as in tiny, because these are dolls, but you know. Second is a small weird eyeliner brush that I got with a fancy cream eyeliner by Clinique (this is the short one with a transparent handle in the photos). It’s the worst eyeliner brush I’ve ever seen, but it works great for applying pastel dust to smaller areas like lips and upper eyelids. Third is a very small flat 10/0 paint brush (it’s the one with the black handle in the photos). I use this brush for eyebrows, shading on the lips, upper eyelids, and lower lids.
I have a nice 20/0 spotter brush (red handle in the photos) that I use for applying the white dots to the eyes, but sometimes I just use my ruined 20/0 spotter that is now my varnish brush, especially if I want the dots to be a little larger.
For tattoos, facial designs, and other things that really can’t be done well with just watercolor pencils, I use a stupidly tiny series of brushes (not shown in photo). The Psycho and Insane Detail brush from JunkySpot are good. I also used to have, and liked, the 10/0-30/0 size brushes from Reaper Miniatures.
Right to left: nice 20/0 spotter, varnish 20/0 spotter, 10/0 flat, eyeshadow brush, eyeliner brush.
Varnish. I use cheap, ancient varnish that works just fine because varnish is varnish to me. Two qualifiers: (1) it has to be shiny (so look for a glossy varnish), and (2) it has to dry non-tacky. Apparently some varnish is tacky. I don’t know why a company would make varnish that doesn’t really dry, but in any case, avoid that varnish for these purposes.
White paint. Acrylic paint, please. I use cheap craft paint that I get for .69 cents at JoAnn fabrics, but it’s a little grainy so I would recommend going a little higher-quality. I just can’t find a good art store in my area yet. This is used for the tiny reflective dots in the eyes. Also seen in that photo at the top is Liquitex Slow-Dry Fluid Retarder. It is basically expensive water that you put into your acrylic paint to thin it out and prevent it from drying so fast. I use this stuff, but I’m honest-to-god sure it’s just water that I paid eight dollars for. So you can definitely use water.
PREPARING THE DOLL
This is where things start getting a little serial-killer-esque.
Removing the factory paint.
First, remove the paint with acetone or a suitable substitute. I use plain Q-tips to do most of the work, but using the special pointy Q-tips is handy for the hard-to-get places like the corners of the lips.
The Q-tips will smear the factory paint around on the face, which is fine. I get as much of the paint off with the Q-tips as I can, then, when the face is mostly clear, I finish up with a round cotton pad with a splash of acetone on it. The cotton pad has more coverage, so it’ll take off any remaining paint smudges without just spreading them around. This is a super important step. There is really nothing worse than getting to the end of the repaint process (and you always discover your mistakes at the end, never the beginning) and realizing half the face is still kind of blue because it has smeared factory paint underneath all your hard work.
Rinse the doll’s face off with water to get rid of any acetone residue and the cotton pad fuzz. Just in case.
Some dangers about removing the paint. I have ruined some dolls at this stage. I have discovered while removing paint that the acetone can work itself into the vinyl of the doll and make small dark spots. They look like freckles. I think it may just be a naturally-occuring tiny hole in the vinyl that then gets paint smeared in it and it’s too small to the get the paint out….But I really don’t know what it is. Sometimes I can save the doll, and at least once I’ve had to repaint it and give it away because I didn’t like those imperfections. This has only happened to me in about five of the dolls I’ve ever done though, so it’s a fairly rare issue.
Other dangers about removing the paint. Acetone will melt the hard plastic on the doll’s body if it comes into contact with it. It will also melt holes in your plastic craft table, just FYI. It won’t ruin the hair if it touches the hair for a bit, though.
Protecting the doll.
Now that the doll is face-less and super creepy, we get to make it creepier by wrapping it in saran wrap. This is when people in your family start wondering if they should be worried.
Wrapping the doll is pretty self-explanatory. I use saran wrap because it stretches and can be pulled really snug against the doll’s hair. The goal is to keep the doll’s hair and hard body from being covered in spray sealant. The hair especially, because the sealant turns it a crusty white and it’s super hard to get out.
Rubber bands or hair ties do a good job of keep the saran wrap close to the hairline. If the saran wrap goes over the hairline and covers part of the doll’s forehead, at the end you’ll notice a line between the MSC-sprayed vinyl and the vinyl that was under the saran wrap, which is something to avoid.
See what I mean about the serial-killer victim? I told you.
Seal the doll.
Now that she’s all wrapped up, spray a thin layer or two of MSC over her face. Do this outside (toxic, remember?), preferably with a respirator (not a mask; a real, actual, zombie-apocalypse-type respirator. They’re on Amazon for $30). If you live in a very humid place, try and do this at the least-humid time of day. You also want to spray when it’s a little warmer outside; the spray won’t work right if it’s very cold.
Hold the nozzle 10-12 inches away from the doll, and make sure to turn the doll at times so the sides of her cheeks get sealed as well. Let the spray dry for ten minutes or so in between coats. Try to avoid a really thick coat: if the layer is too thick the MSC starts to dry a little shiny.
As always…if you have a question, leave a comment below, or get in touch with me on my Facebook page.


 Varnish. My varnish is thinner, so it’s not as shiny. I put two or three layers of varnish on the eyes, and at least three on her lips. Let each coat of varnish dry before putting additional coats on.